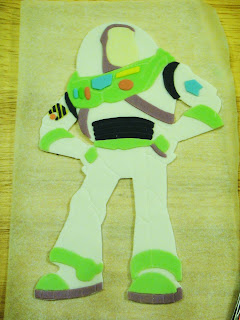
As I mentioned on Facebook, I'm gonna do a tutorial on how to make a 2D Buzz Lightyear figure! It's been a while since I made a tutorial. I hope you guys enjoy this. It's actually not that hard to make, but the thing is theres a lot of small pieces to cut which can strain your eyes after a while.
First, you need to print out 2 pictures of Buzz. I got these off the internet, fitted them on an A4 paper, and printed them out. Which means these are actually half an A4 size each. It really depends on how big your cake is and how you want to lay it on the cake. You can adjust the size accordingly.
After printing the picture, cut them as how I did in the picture above. The big piece you will use to cut the white base out, and the small pieces you will use to cut the different colours of pieces as how you see on Buzz.
After that, using a piece of polystyrene and a needle or a toothpick...
place the big picture of buzz on the polystyrene and..
Poke holes on the lines of the picture.
And you'll get this which later you'll be pressing onto the fondant.
Next, roll out the fondant until its not too thick nor too thin (too thick it wont look pretty, too thin it'll be harder to handle and easier to crack once it's dry), place it on a parchment paper, and place the big picture of buzz facing down on the fondant.
Then with a sharp knife or pen knife, cut the fondant according to the picture..
And don't forget to cut the arms out as well.
You'll get this. Now turn the fondant around on the parchment paper, nicely place the picture of buzz again, this time the right side up, and rub the picture down onto the fondant gently. The holes that you poked earlier will create and indent on the fondant and serve as your guideline. If the indent is to faint for your eyes, use the needle or toothpick and poke through the holes on the fondant.
Using the tool above (or any other blunt tool), you can now trace out the lines on the fondant by following the indent that you have made earlier.
Next, use the smaller pieces that you have cut out as moulds to cut out the different colour fondant and place them on the right spot. By this time, it would be easy for you to identify where each piece goes, according to the outline that you have made earlier.
And lastly for the face, you just need a little bit of imagination and just follow the picture of buzz, and form the small shapes from the fondant by hand. For the outline of the mouth and chin and the "lightyear" badge, I just used a toothpick and some black wilton food colouring. But you need to make sure that the fondant has completely dried before you can do this, otherwise the colourwill spread and it will look awful.
And now you have the handsome Buzz Lightyear!
"To infinity...and beyond!"


very the cool u know! my kids will luv this, their fav character, mak nya pun suka :)
ReplyDeletekalau dah dekat, sure2 i order fr u.
u r very talented. kp up the gd work!
oh thank you very much! Sure sure..boleh je..nnti email je =)
ReplyDeleteI suka sangat. Tau blog ni drpd Ikin punya blog. Sure, birthday anak I lepas raya, I order drpd u ok. Detail nanti I email.
ReplyDeleteThank you great tutorial!
ReplyDeleteThank you for the tutorial! I have someone that wants a bunch of Mario Brothers characters and I may try this. Do you make it ahead of time or do you do it right before you place it on the cake?
ReplyDeleteBrilliant such a gr8 tutorial thanks for sharing
ReplyDeleteThis comment has been removed by the author.
ReplyDeleteI love how detailed this tutorial is!
ReplyDelete